Tuesday, August 28, 2007

Pad Thai

Weekly meal planning has gone to hell this week, due to our new puppy addition. It's much more fun to play with Patches than it is to pour over cookbooks right now.

Which is why we ate dinner out of a box last night. (Gasp!)

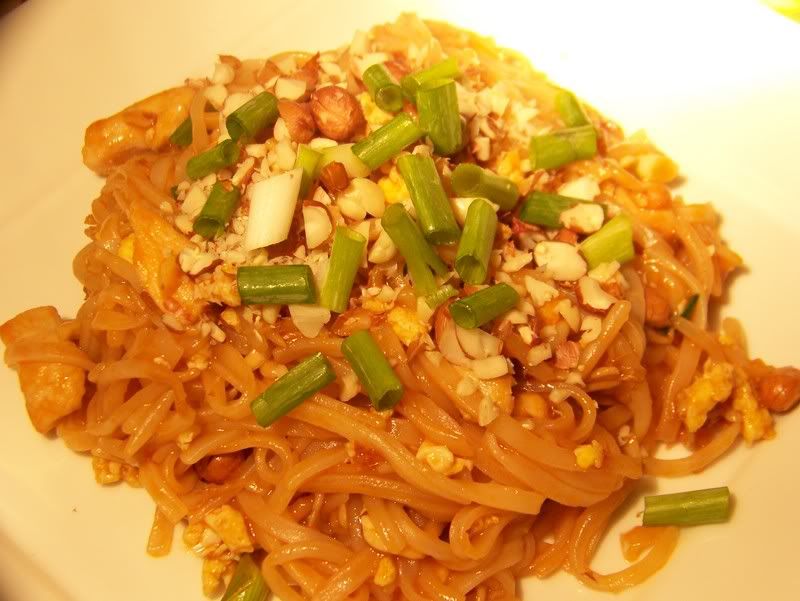
I LOVE PAD THAI! It's what I order when we go out for Thai food. I love the rice noodles, and the sweet yet slightly sour and spicey sauce that accompanies it. I especially love the many textures you get in the dish - the noodles are soft, but still have a bite to them, the peanuts provide a chewiness when they hit the heat, and the bean sprouts lend a nice crunch.

I've been reluctant to try to make original Pad Thai from scratch, when this box version tastes so good. Dinner is ready in a snap - - and because you actually have to cook something, you feel good about making it. It's almost as easy as picking up the phone and ordering take out! For my money, the Thai Kitchen brand is definitely the best one on the store shelves. (Damn, I wish I was getting paid for this review!) I change up the recipe slightly from the directions on the box, depending on my culinary mood.

Thai Kitchen's ORIGINAL PAD THAI
(makes a meal for 2)

1 box Thai Kitchen Original Pad Thai Stir Fry Rice Noodles with Sauce (see picture above)
2 chicken breasts, cut into strips*
12 medium shrimp, de-shelled and de-viened*
6 oz. tofu, cut into cubes*
2 eggs
4 tsbp vegetable oil
1 can of bean sprouts, drained
1/4 cup green onions, sliced into 1-inch straws
1/2 cup peanuts, roughly chopped
boiling water

In a large bowl, soak rice noodles in boiling water for approximately 20-25 minutes.

When you have about 5 minutes left in your soak, heat 1 tbsp oil in a large skillet over high heat. Scramble eggs, stirring constantly. Once eggs are cooked, remove from heat and set aside. Place remaining oil in skillet, and once hot, saute chicken, shrimp and tofu. Add soft rice noodles and sauce packet, and stir to combine. Let cook a couple of minutes until the noodles absorb all of the sauce. Add green onions and peanuts. Cook an additional minute. Finish the dish with cooked eggs and bean sprouts. If desired, garnish with some additional green onion and chopped peanuts. Sometimes I add a lime wedge if I want to be fancy!

*These proteins are completely optional. Last night, I made it with only chicken - which is what I had on hand. However, I've made it with no proteins, or all three, and it is still delicious.


The last time I made it, I didn't have any peanuts (I know I had some - - but they were mysteriously eaten!)...so I added a tablespoon of crunchy peanut butter. I never even missed the peanuts!

BTW - these rice noodles are gluten free, which is pretty darn awesome if you adhere to a gluten free diet.

Monday, August 27, 2007

Seared Scallops with Warmed Creamed Corn Salad

The last time I made scallops, I bought them fresh and wrapped them in bacon, but was a little disappointed in the outcome because they were filled with grit! This time I went the frozen route, hoping that the package process included some filtering of all the sand. Going frozen paid off this time! (Although the drawback was teeny-tiny scallops, instead of the jumbo variety that I really wanted.)

Scallops taste best when cooked simply, in my humble opinion. A little butter, salt and pepper and 2-3 minutes per side of intense heat is all they really need to be carmelized, tender, sweet and delicious. This recipe highlights the simple scallop, on top of a impressive bed of fresh homemade creamed corn. What a perfect summertime dinner!


SEARED SCALLOPS with WARMED CREAMED CORN SALAD

1 lb jumbo sea scallops (or about 5-6 scallops per person)
8 ears of corn, shucked
1 green bell pepper, finely diced
1 onion, finely diced
2 carrots, peeled and finely diced
2 celery ribs, finely diced
1 cup heavy cream
3 tbsp fresh basil, torn
1 tsp red pepper flakes
salt and pepper, to taste
4 tbsp butter
1 tbsp olive oil

Shuck corn, and gently cut corn off the cob into a large bowl. Melt 3 tbsp of butter in a large skillet over medium heat. Add corn, pepper, onion, carrots and celery and cook until onions are translucent and vegetables are crisp tender. Add cream and season with salt, pepper and red pepper flakes. Cook until cream reduces slightly, stirring occassionally. Directly before service, add basil.

Meanwhile, melt remaining 1 tbsp butter with olive oil in a skillet. Rinse and dry scallops, and season with salt and pepper. Place seasoned scallops in skillet, and cook approximately 2-3 minutes on each side until the scallops are golden brown. Remove from heat and serve alongside, or on top of warmed corn salad.

There is nothing better than fresh picked local corn! I eat it raw and cooked, and this application was nice and light, but satisfying in a vegetarian kind of way. The red pepper flakes added just a bit of punch in the background and the carrots and green bell pepper provided the color that made this dish pop. I wish my photo did this meal justice!

Monday, August 20, 2007

Swiss Steak

Swiss Steak was a staple in my home growing up...it was one of the few meals that my mother felt comfortable making - that and Shepard's Pie, which I still refuse to make. I never cared for it much due to the overcooking of all of the vegetables in the dish. I absolutely hate mushy vegetables, and unfortunately my mother liked to cook the hell out of all of 'em.

This recipe is very traditional, and rib-sticking good...but I've changed it up just a bit so that the peppers remain peppers, and don't become mush-meal. Novel idea, right?

SWISS STEAK

4 pieces of cubed steak*
3 tbsp flour
1 tsp dried mustard
salt and pepper
2 tbsp vegetable oil
2 cans of whole or stewed tomatoes, with their juice
1 large green bell pepper, cut into strips
1 onion, sliced
2 garlic cloves, finely minced
water, if needed

In a small bowl, combine flour, mustard and salt and pepper. Combine. Lay out cube steak on a piece of plastic wrap. Lightly sprinkle meat with 1/2 of flour mixture. Use the tenderizing part of a kitchen mallet to pound steaks, so that the flour becomes incorporated in the steak. Repeat with opposite side, using the rest of the flour.

Heat vegetable oil in a large skillet. When hot, carefully place prepped steak across the bottom in an even layer. Cook for 7 minutes on each side, until steaks are browned and completely cooked through. Add tomatoes, their juice and garlic, reduce heat and cover for 1 1/2 hours - turning the meat occasionally. (The tomatoes will break down the meat making it fork tender.)

Add onions and peppers to the hot skillet, and gently stir so that the tomatoes and vegetables combine. Add water, if necessary. Cook for about 7-10 minutes, until the onions are translucent and the peppers are crisp-tender. Serve alongside some creamy mashed potatoes or egg noodle pasta. It's one of our favorite comfort meals.


I totally smother my potatoes with the tomato mixture...

*You can make your own cube steak with the use of a kitchen mallet. It's a great way to get that evening frustration out!

Weekly Meal Planning

Sunday - Swiss Steak
Monday - Pasta Primavera
Tuesday - Seared Scallops over Creamed Corn Salad
Wednesday - Chicken fajitas
Thursday - Pizza (our new puppy comes home!)
Friday - Beef Stroganoff
Saturday - Challah French Toast with Caramelized Apples

A little bit of cool summer flare...a little bit of warm and comfy winter eats. The weather is acting up a bit, so it's the perfect week to mix it up a bit!

Wednesday, August 15, 2007

For my B'day...Lattice Pear Pie

When you make your own birthday dessert, it means that you are really and truly a grown-up. Damn. I rather liked being a kid!

For the past decade, instead of a birthday cake I requested a birthday pie - my take on "bucking the system." (I know, I'm such a bad ass!) But, I just adore pies...fruit pies to be exact. Strawberry rhubarb, apple, cherry, peach, blueberry and most recently pear! I love the way the fruit bakes down and gives it's juices creating this gooey sticky goodness in the middle of a crust.

I've made one successful crust in my 31 years. One! The stars aligned and the gods smiled down...I thought I had conquered the great crust mystery...but as soon as it came, it went. I have not been able to recreate that flaky buttery goodness since. Luckily, store bought pie crusts aren't too bad! They are my saving grace.

Without further ado - the recipe for this year's birthday pie:

LATTICE PEAR PIE with BROWN BUTTER

8 ripe pears
2 tsp fresh lemon juice
1/2 cup packed brown sugar
2 tbsp butter
1 vanilla bean, split with insides scrapped out
2 tbsp flour
1/4 cup golden raisins
1/4 tsp salt
2 prepared pie crusts
1 tbsp milk
1 tbsp sugar

Preheat oven to 375 degrees. Melt butter in a small skillet over medium heat. Add vanilla bean to butter and cook until butter is browned - about 3 minutes. Remove from heat, discard vanilla bean and set aside. Slice pears into a large bowl. Add lemon juice, brown sugar, flour, raisins and salt and stir to combine. Add browned butter mixture to pears and gently stir to combine.

Prepare your pie dish...roll out first crust and lay on the bottom of the pie dish. Fill dish with pear mixture. Roll out second crust on a lightly floured surface, and create your lattice pattern. Go
here for step-by-step instructions, or just fake it, like I did. (It'll taste good all the same!) Crimp edges, brush crusts with milk and lightly sprinkle sugar over the top. Bake for 1 hour and 20 minutes, or until filling is bubbly and crust is golden brown. If the crust browns too quickly, simply drape foil over the pie.

Serve hot with a little french vanilla ice cream, or as Nathan calls it "a la mote." Yep, you read that right. I've corrected him a thousand times, but it makes no difference.


Happy Birthday to me!

I can not believe how yummy this filling came out! The brown butter lent a wonderful nuttiness, and the raisins plumped up making a nice contrast between with the grainy texture of the pears. I left the skin (red) on the pears, instead of peeling them because I wanted that pretty punch of color. It was such a different and decadent summertime treat.


Tuesday, August 14, 2007

Savory Bacon and Potato Chowder

When I was 18 years old, I moved out of my parents house (for good, thank you very much!). One of the first meals I made was this hearty chowder, and honestly it was because of this meal that I found out I loved cooking. Not only is it made with bacon - BACON!! - but one bowl of the stuff will fill you up until breakfast the next morning. It's also good for a crowd, because you don't have to spend the money on a lean slab of bacon, the fattier kind actually works a little better because the grease is a major ingredient. It's a recipe that is easily doubled, without adding any additional prep or cooking time, and the prep is ridiculously easy...you basically cut up potatoes. Child's play, I tell ya!

Make this and bask in all of the praise you receive...

SAVORY BACON AND POTATO CHOWDER

8 slices of bacon, cut into cubes
2 cups new potatoes, scrubbed and cut into bite sized pieces
1 cup whole kernel frozen or fresh corn
1 1/2 cups milk
1 can of cream of chicken soup
1 cup sour cream
1 medium onion, diced
pepper, to taste
thyme (fresh herbs do taste better, but dried are just fine) - adjust accordingly
water or chicken stock, optional

Fry up bacon in a large pot until crisp, and most of the fat has rendered. Add onions and potatoes to the bacon and grease and cook until potatoes begin to soften and onions become translucent, stirring often. (You can drain off some of the grease.) Add milk, cream of chicken soup and sour cream and stir until well combined. (Note: you may want to add some chicken stock or water to thin out the soup as it will reduce down some...it totally depends on how chunky you prefer your overall product to be.) Bring to a boil, and cook until potatoes are soft. Add corn, thyme and pepper. Serve alongside a salad, or in a bread bowl.


We like ours chunky...Nathan actually ate his with a fork!

Speaking of Nathan - he also ate the entire bread bowl...in one sitting! Not only did he eat the bowl, but he also ate the bread I scooped out to make the bowl shape. I was amazed and horrified, all at the same time. I don't know where he puts it.

Monday, August 13, 2007

Weekly Meal Planning

Monday - Savory Bacon and Potato Chowder served in a bread bowl (didn't get to make this last week, so we are finally having it tonight!)
Tuesday - Crab Cakes with Spicy Avocado Sauce and a Garden Salad
Wednesday - It's my birthday, and we are going out!
Thursday - Veggie Wontons with Citrus Soy Dipping Sauce and Vegetarian "Sushi" rolls
Friday - Pizza
Saturday - Bok Choy with Sausage over Polenta

Big Flavor all we long...

Sweet and Sour Meatballs

This recipe is so easy that I was able to make it 1. while camping, and 2. with a freakin broken finger! Next time, I will probably make my own meatballs since I did not enjoy the texture of the store-bought kind, but all in all the meal was very tasty and was fresh from the stove to the plate in about 20 minutes, flat.

SWEET AND SOUR MEATBALLS

2 bell peppers, any color, cubed (I did a trifecta of green, red and yellow)
1 tbsp soy sauce
2 tbsp firmly packed brown sugar
2 tbsp apple cider vinegar
1 20 oz. can of pineapple chunks with juice
1 tbsp cornstarch
1/2 tsp ground ginger
2 tbsp butter
2 lbs cooked meatballs

In a large stock pot combine butter, soy sauce, pineapple juice, brown sugar cornstarch, ginger and vinegar until thick and bubbly. Add peppers, meatballs and pineapple chunks stirring to combine with sauce. Cook until meatballs are hot and peppers are crisp-tender. Serve over rice.


Glistening, in the sauce!

While we were chowing down, I couldn't help but think that these meatballs would make a perfect little colorful party appetizer - skewer one meatball, one pepper and one pineapple chunk and serve along side the sauce for easy dipping.

Thursday, August 09, 2007

This recipe is for Lisa, who requested that I post it.

Hey Lisa, you will not be disappointed! This meal was killer! I was a little unsure of the pumpkin part of the ingredient list - - but the canned (real) pumpkin actually lent a creamy subtle flavor that blended nicely with the sage and chicken. Plus, it takes about 15 minutes to put the whole thing together. Who doesn't like meals like that?!

PASTA and CHICKEN with PUMPKIN CREAM SAUCE

2 boneless, skinless chicken breasts - cut into 1 inch strips
1 package of bow tie pasta
1 tbsp vegetable oil
1 garlic clove, finely minced
1 cup Libby's real canned pumpkin
1/2 cup chicken stock
3/4 cup heavy cream
2 tbsp fresh sage, finely chopped
1 cup roughly chopped pecans
salt and pepper to taste
pinch of fresh nutmeg (optional)

Prepare pasta according to package directions.

In a medium bowl, combine pumpkin, chicken stock, cream and sage. Set aside. Meanwhile, toast pecans in a dry (no oil or butter!) small skillet, until they become fragrant. Set aside.

In a large skillet saute chicken and garlic in oil until chicken is golden and cooked through. Add cooked pasta. Immediately add pumpkin sauce and cook until sauce is hot. Add half of the pecans and mix. Season with salt and pepper, and add a pinch of nutmeg as your "secret ingredient." (I always add nutmeg in cream sauces.) Remove from heat and divide into servings. Top with remaining pecans.


There were no leftovers. None. The puppy didn't even get to taste!

Tuesday, August 07, 2007

Seared Salmon with New Potatoes and Dijon Broth

Oh my YUM!

If someone were to shout "All you fish haters, raise your hand" my arm would be in the air so fast, I'd probably pull a muscle! Some may notice that we do eat our fair share of seafood with all the recipes I post - and honestly, it's because I'm constantly told that fish is good for you. (Except fish from China...some of those are very, very bad.) I usually force myself to eat what's on the plate, and I do admit that it's not that bad...but I'll never crave the stuff, although I do tolerate it.

But THIS recipe is the bomb! I'm serious!!! Fish lovers and fish haters can stand and rejoice in unity - - it's that good.


Note: This recipe has a couple of separate components, so I am going to space them apart in the ingredient list.

SEARED SALMON with NEW POTATOES and DIJON BROTH

1 1/2 pounds baby red skinned potatoes, unpeeled

2 tbsp butter
2 tbsp canola or vegetable oil
4 6-8 oz. skinless wild salmon fillets

2 cups dry vermouth
2 large shallots, thinly sliced
2 tbsp apple cider vinegar
1 1/2 cups chicken broth
2 tbsp chopped fresh sage, plus more for garnish
1 tbsp dijon mustard

2 tbsp olive oil
1 1/2 pounds fresh baby spinach leaves

Preheat oven to 400 degrees. Place whole potatoes in a large saucepan and fill with cold water. Bring to a boil and cook until almost cooked through, approximately 12 minutes. Drain. Once cool to the touch, cut potatoes in half and set aside.

Combine vermouth, shallots and vinegar in heavy large saucepan. Boil until reduced to 1 cup, approximately 7 minutes. Add chicken broth, chopped sage and mustard. Bring just to a boil.

Meanwhile, in a large skillet, melt butter with canola oil over high heat. Season salmon with salt and pepper. Place salmon in skillet, flat side up. Cook until brown, turning once. Carefully arrange salmon, flat side down in a large baking dish. Scatter potatoes around salmon. Pour hot broth over salmon and potatoes. Bake in the oven until salmon and potatoes are thoroughly cooked, approximately 20 minutes.

Using the same skillet you browned the fish in, heat some olive oil in with the brown bits left from the salmon. Add spinach to the skillet and toss until wilted. For service: divide spinach among 4 bowls. Top each with potatoes and 1 fillet of salmon. Divide broth, garnish with sage (or, in my case - basil) and serve!

The reduced vermouth adds that sweet somethin' somethin' that totally becomes infused in the salmon. If you don't have vermouth, you can easily substitute your favorite dry white wine instead.


I swear that you will be digging for a spoon to drink up all that delicious broth!

Meditteranean Egg Bake

Pretty fancy name for a basic frittata, no?

Frittata's are simple and easy and the prefect meal to make when you want something light, tasty and fast. It's perfectly OK to go really basic with just onion and garlic as your flavorings - or to go more gourmet with fancy cheeses, shallots, vegetables and meat.

This one takes you to Greece with a bit of spinach, feta cheese and fresh vine ripened tomato - straight from the garden. Paired with a green salad, it makes for a wonderfully light and satisfying summertime meal.

MEDITTERANEAN EGG BAKE

2 tbsp butter
1 red pepper, chopped
1/2 medium onion, finely chopped
1 garlic clove, finely minced
1 cup fresh spinach
8 whole eggs
1/2 cup of milk
2 ounces crumbled feta cheese
salt and pepper, to taste

Tomato Topping:
1 ripened tomato, diced
1 tbsp extra virgin olive oil
salt and pepper, to taste
2 tbsp chopped fresh basil or parsley

Preheat oven to 350 degrees.

In a large oven proof skillet, melt butter over medium heat. Add onions, garlic and peppers and saute until onions are translucent. Add spinach and continue to saute until wilted.

Meanwhile, in a large bowl whisk together eggs, milk, cheese and salt and pepper until well combined. Add to spinach mixture on stovetop, and stir until eggs begin to cook. Transfer entire skillet to the oven, and cook for approximately 12-15 minutes, or until the top is slightly brown and eggs are set. Remove from oven and let cool 2-3 minutes. Use a knife to cut wedges of frittata (as you would a pie).

In a small bowl, combine diced tomato, oil, salt and pepper and basil. Top frittata slice with tomato mixture and serve.


Believe it or not, the leftovers make a great breakfast or lunch! The eggs are still light and fluffy and do not turn rubbery when re-heated.

Monday, August 06, 2007

Weekly Meal Planning

Monday - Mediterranean Egg Bake and a Garden Salad
Tuesday - Seared Salmon with New Potatoes and Dijon Broth
Wednesday - Savory Bacon Potato Chowder served in a Bread Bowl
Thursday - Pasta and Chicken in Pumpkin Cream Sauce
Friday - Pizza
Saturday - Sweet and Sour Meatballs